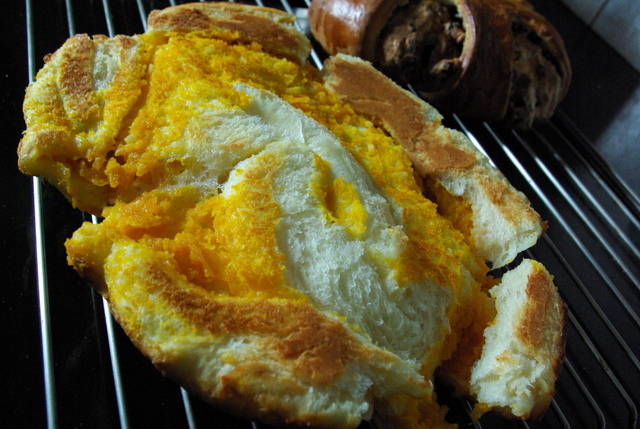
I got to say, when I saw the name "coffee cake"; I really thought there was coffee inside. Then I read the recipe and my brain went, "Oh? So this is coffee cake."

The March 2011 Daring Baker’s Challenge was hosted by Ria of Ria’s Collection and Jamie of Life’s a Feast. Ria and Jamie challenged The Daring Bakers to bake a yeasted Meringue Coffee Cake.
Make 2 round cakes, 6 inches in diameter
Yeast Coffee Cake Dough
300 g flour
20 g sugar
1/2 teaspoon salt
3.5 g active dried yeast
90 ml soya milk
30 ml water
67.5 g vegetable oil
1 large eggs at room temperature
Meringue
2 medium sized egg whites at room temperature
Pinch of Salt
1/4 teaspoon vanilla
55g sugar
Pumpkin Puree Filling
Around 500g pumpkin
2 tablespoon soya milk
2 tablespoon sugar (to taste)
Chocolate Cinnamon Nut
55 g chopped nuts
15 g granulated sugar
1/4 teaspoon ground cinnamon
50 g semisweet chocolate chips
1. In a large mixing bowl, combine 115g of the flour, the sugar, salt and yeast.
2. In a saucepan, combine the milk, water and oil and heat over medium heat until just above room temperature.
3. With an electric mixer on low speed, gradually add the warm liquid to the flour/yeast mixture, beating until well blended.
4.Increase mixer speed to medium and beat 2 minutes. Add the eggs and 75 g flour and beat for 2 more minutes.
5. Using a wooden spoon, stir in enough of the remaining flour to make a dough that holds together. Turn out onto a floured surface (use any of the remaining flour) and knead the dough for 8 to 10 minutes until the dough is soft, smooth, sexy and elastic, keeping the work surface floured and adding extra flour as needed.
(But try to avoid this, more flour means tougher cake in the end.)
6. Place the dough in a lightly greased (I use vegetable oil) bowl, turning to coat all sides. Cover the bowl with plastic wrap and a kitchen towel and let rise until double in bulk, 45 – 60 minutes. The rising time will depend on the type of yeast you use.
7. Prepare your filling. In a small bowl, combine the cinnamon and sugar for the filling. I found it easier to sprinkle on both the nuts and the chocolate separately.
8. Grate the pumpkin finely (remember, the finer they are, the greater the surface area, and the faster it'll be cooked through.) Put into a saucepan over low heat. Stirring occasionally. Add the sugar. Put into a blender with the milk and pureed.
9. Once the dough has doubled, make the meringue: In a clean mixing bowl – ideally a plastic or metal bowl so the egg whites adhere to the side (they slip on glass) and you don’t end up with liquid remaining in the bottom – beat the egg whites with the salt, first on low speed for 30 seconds, then increase to high and continue beating until foamy and opaque. Add the vanilla then start adding the sugar, a tablespoon at a time as you beat, until very stiff, glossy peaks form.
Assemble the Coffee Cakes
1. Line 2 baking/cookie sheets with parchment paper.
2. Punch down the dough and divide in half. On a lightly floured surface, working one piece of the dough at a time (keep the other half of the dough wrapped in plastic), roll out the dough into a 15 x 8-inch rectangle. Spread half of the meringue evenly over the rectangle up to about 1/2-inch (3/4 cm) from the edges.
3. Sprinkle the filling evenly over the meringue.
4. Roll up the dough jellyroll style, from the long side. Pinch the seam closed to seal. Very carefully transfer the filled log to one of the lined cookie sheets, seam side down. Bring the ends of the log around and seal the ends together, forming a ring, tucking one end into the other and pinching to seal.
5. Using kitchen scissors or a sharp knife (although scissors are easier), make cuts along the outside edge at 1-inch (2 ½ cm) intervals. Make them as shallow or as deep as desired but don’t be afraid to cut deep into the ring.
6. Repeat with the remaining dough, meringue and fillings. Cover the 2 coffee cakes with plastic wrap and allow them to rise again for 45 to 60 minutes.
7. Preheat the oven to 180°C. Brush the tops of the coffee cakes with egg wash. Bake in the preheated oven for 25 to 30 minutes until risen and golden brown. The dough should sound hollow when tapped.
8. Remove from the oven and slide the parchment paper off the cookie sheets onto the table. Very gently loosen the coffee cakes from the paper with a large spatula and carefully slide the cakes off onto cooling racks. Allow to cool.
Just before serving, dust the tops of the coffee cakes with confectioner’s sugar as well as cocoa powder if using chocolate in the filling. These are best eaten fresh, the same day or the next day.
Yeast Coffee Cake Dough
300 g flour
20 g sugar
1/2 teaspoon salt
3.5 g active dried yeast
90 ml soya milk
30 ml water
67.5 g vegetable oil
1 large eggs at room temperature
Meringue
2 medium sized egg whites at room temperature
Pinch of Salt
1/4 teaspoon vanilla
55g sugar
Pumpkin Puree Filling
Around 500g pumpkin
2 tablespoon soya milk
2 tablespoon sugar (to taste)
Chocolate Cinnamon Nut
55 g chopped nuts
15 g granulated sugar
1/4 teaspoon ground cinnamon
50 g semisweet chocolate chips
1. In a large mixing bowl, combine 115g of the flour, the sugar, salt and yeast.
2. In a saucepan, combine the milk, water and oil and heat over medium heat until just above room temperature.
3. With an electric mixer on low speed, gradually add the warm liquid to the flour/yeast mixture, beating until well blended.
 |  |  |
4.Increase mixer speed to medium and beat 2 minutes. Add the eggs and 75 g flour and beat for 2 more minutes.
 |  |  |
5. Using a wooden spoon, stir in enough of the remaining flour to make a dough that holds together. Turn out onto a floured surface (use any of the remaining flour) and knead the dough for 8 to 10 minutes until the dough is soft, smooth, sexy and elastic, keeping the work surface floured and adding extra flour as needed.
(But try to avoid this, more flour means tougher cake in the end.)
6. Place the dough in a lightly greased (I use vegetable oil) bowl, turning to coat all sides. Cover the bowl with plastic wrap and a kitchen towel and let rise until double in bulk, 45 – 60 minutes. The rising time will depend on the type of yeast you use.
 |  |
7. Prepare your filling. In a small bowl, combine the cinnamon and sugar for the filling. I found it easier to sprinkle on both the nuts and the chocolate separately.
8. Grate the pumpkin finely (remember, the finer they are, the greater the surface area, and the faster it'll be cooked through.) Put into a saucepan over low heat. Stirring occasionally. Add the sugar. Put into a blender with the milk and pureed.
 |  |
9. Once the dough has doubled, make the meringue: In a clean mixing bowl – ideally a plastic or metal bowl so the egg whites adhere to the side (they slip on glass) and you don’t end up with liquid remaining in the bottom – beat the egg whites with the salt, first on low speed for 30 seconds, then increase to high and continue beating until foamy and opaque. Add the vanilla then start adding the sugar, a tablespoon at a time as you beat, until very stiff, glossy peaks form.
 PHail |  |
Assemble the Coffee Cakes
1. Line 2 baking/cookie sheets with parchment paper.
2. Punch down the dough and divide in half. On a lightly floured surface, working one piece of the dough at a time (keep the other half of the dough wrapped in plastic), roll out the dough into a 15 x 8-inch rectangle. Spread half of the meringue evenly over the rectangle up to about 1/2-inch (3/4 cm) from the edges.
3. Sprinkle the filling evenly over the meringue.
4. Roll up the dough jellyroll style, from the long side. Pinch the seam closed to seal. Very carefully transfer the filled log to one of the lined cookie sheets, seam side down. Bring the ends of the log around and seal the ends together, forming a ring, tucking one end into the other and pinching to seal.
5. Using kitchen scissors or a sharp knife (although scissors are easier), make cuts along the outside edge at 1-inch (2 ½ cm) intervals. Make them as shallow or as deep as desired but don’t be afraid to cut deep into the ring.
6. Repeat with the remaining dough, meringue and fillings. Cover the 2 coffee cakes with plastic wrap and allow them to rise again for 45 to 60 minutes.
7. Preheat the oven to 180°C. Brush the tops of the coffee cakes with egg wash. Bake in the preheated oven for 25 to 30 minutes until risen and golden brown. The dough should sound hollow when tapped.
 |  |
 |  |
 |  |
Just before serving, dust the tops of the coffee cakes with confectioner’s sugar as well as cocoa powder if using chocolate in the filling. These are best eaten fresh, the same day or the next day.