Showing posts with label Lactose Intolerant. Show all posts
11:57 PM

Daring Bakers' From Phyllo to Baklava...Rolls!

I've been MIA-ing for the past 2 months. Finally started my new course in Communicative Designs, and I've been swarmed! The art school is called The One Academy, TOA, which, rightly-so also stands for Tons Of Assignments.

But here I am! On what I call a 'none-holiday'. Because we only get 2 days off out of the supposed week. *sigh* and I have to spend this time doing what is a mountain of work.

Enough rant.

BAKLAVA!!

Erica of Erica’s Edibles was our host for the Daring Baker’s June challenge. Erica challenged us to be truly DARING by making homemade phyllo dough and then to use that homemade dough to make Baklava.

I've never even tasted these before. I have, however seen them on menus at some middle-eastern restaurants, and i have a friend who swears they are the best tasting dessert on earth. So imagine my delight when I found out we had to make these.

Phyllo Pastry

Ingredients
1 1/3 cups (320 ml) (185 gm/6½ oz) unbleached all purpose (plain) flour
1/8 teaspoon (2/3 ml) (¾ gm) salt
1/2 cup less 1 tablespoon (105 ml) water, plus more if needed
2 tablespoons (30 ml) vegetable oil, plus additional for coating the dough
1/2 teaspoon (2½ ml) cider vinegar (I actually use red wine vinegar.)

1. In the bowl of your stand mixer combine flour and salt
2. Mix with paddle attachment
3. Combine water, oil and vinegar in a small bowl.
4. Add water & oil mixture with mixer on low speed, mix until you get a soft dough, if it appears dry add a little more water.

5. Change to the dough hook and let knead approximately 10 minutes. You will end up with beautiful smooth dough. If you are kneading by hand, knead approx. 20 minutes.
6. Remove the dough from mixer and continue to knead for 2 more minutes. Pick up the dough and through it down hard on the counter a few times during the kneading process.(Note: Good de-stresser; mental note: must make this more often.)
7. Shape the dough into a ball and lightly cover with oil.
8. Wrap tightly in plastic wrap and let rest 30-90 minutes, longer is best ( I let mine rest for just over 2 hours)

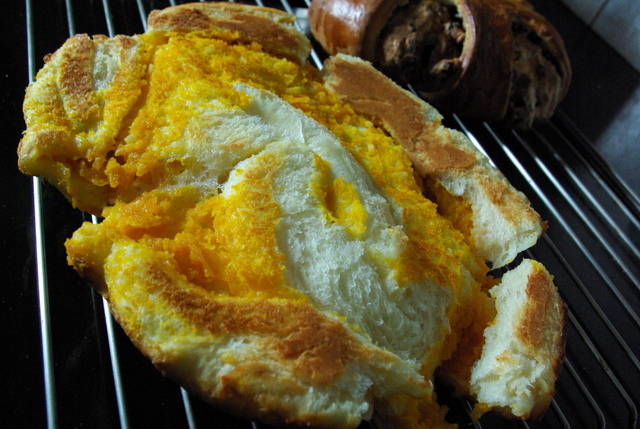
9. After resting, flour the heck out of everything, because you canNOT over-flour this dough. And cut off a chunk about the size of a golf ball and start rolling.
Looky here for how. =)


Filling

Ingredients
Zest of an orange
1 cup Almond
1/2 cup Hazelnut
8 tbsp sugar
1 tsp nutmeg
2 tsp cinnamon

1. Using a processor crush the almond and hazelnut with 2 tbsp of sugar.
2. Mix everything together.

Baklava Making!
(Makes enough rolls to fit an 8" square baking dish)

1/2 cup oil (original recipe says clarified butter, but I'm lactose intolerant, hence the oil.)

1. Preheat oven to moderate 350°F/180°C/gas mark 4.
2. Butter your baking dish.
3. Take a sheet of phyllo pastry and oil the top, sprinkle with the nut mixture liberally, and using a thin dower or, like I did, by using a long chopstick, roll up the pastry.
4. Oil a second sheet, and place this rolled up pastry, with the chopstick still intact, and roll up in the second sheet.
5. Push down into the pan, releasing the chopstick.
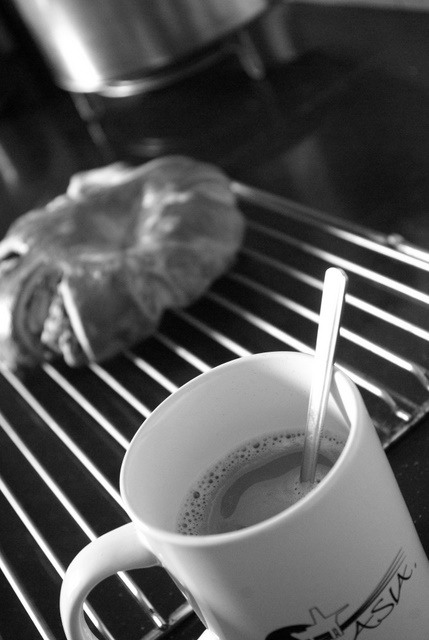
I know this sound so confusing, I don't even understand that myself, so please do watch this.
6. Repeat until you have used up all the pastry. and oil the top of them.
7. Using scissors, snipped half way through the rolls, and bake for 30 mins.
8. Snipped the whole way down and bake for another 30 minutes, until golden brown.
9. Pour the syrup, mostly into the gaps, and some on top. (You will hear a sizzle, this is the pastry drinking up that juice)
10. Leave overnight to let it absorb and develop this amazing texture.


Cinnamon Citrus Syrup

Ingredients
1 1/2 cup fresh orange juice
1 cinnamon stick
1 cup sugar
1 2-inch slice of citrus peel (I used a lemon)
1/2 teaspoon nutmeg
1 teaspoon cinnamon

When you put your baklava in the oven start making your syrup. When you combine the two, one of them needs to be hot, I find it better when the baklava is hot and the syrup has cooled.

1. Put everything except the nutmeg and the cinnamon powder into a pot, and boil for 10 minutes, stirring occasionally.
2. Strain the the syrup, and mix in the nutmeg and cinnamon.
3. Let it cool.


*Just outta ze oven*

*Slurping up the syrup*

Aren't they a thing of beauty?
Taste oh-so-nice!!
6:31 PM

Daring Bakers' Dairy Free Filled Meringe Coffee Cake


I got to say, when I saw the name "coffee cake"; I really thought there was coffee inside. Then I read the recipe and my brain went, "Oh? So this is coffee cake."


The March 2011 Daring Baker’s Challenge was hosted by Ria of Ria’s Collection and Jamie of Life’s a Feast. Ria and Jamie challenged The Daring Bakers to bake a yeasted Meringue Coffee Cake.

Make 2 round cakes, 6 inches in diameter
Yeast Coffee Cake Dough

300 g flour
20 g sugar
1/2 teaspoon salt
3.5 g active dried yeast
90 ml soya milk
30 ml water
67.5 g vegetable oil
1 large eggs at room temperature

Meringue
2 medium sized egg whites at room temperature
Pinch of Salt
1/4 teaspoon vanilla
55g sugar

Pumpkin Puree Filling
Around 500g pumpkin
2 tablespoon soya milk
2 tablespoon sugar (to taste)

Chocolate Cinnamon Nut
55 g chopped nuts
15 g granulated sugar
1/4 teaspoon ground cinnamon
50 g semisweet chocolate chips

1. In a large mixing bowl, combine 115g of the flour, the sugar, salt and yeast.
2. In a saucepan, combine the milk, water and oil and heat over medium heat until just above room temperature.
3. With an electric mixer on low speed, gradually add the warm liquid to the flour/yeast mixture, beating until well blended.


4.Increase mixer speed to medium and beat 2 minutes. Add the eggs and 75 g flour and beat for 2 more minutes.


5. Using a wooden spoon, stir in enough of the remaining flour to make a dough that holds together. Turn out onto a floured surface (use any of the remaining flour) and knead the dough for 8 to 10 minutes until the dough is soft, smooth, sexy and elastic, keeping the work surface floured and adding extra flour as needed.
(But try to avoid this, more flour means tougher cake in the end.)
6. Place the dough in a lightly greased (I use vegetable oil) bowl, turning to coat all sides. Cover the bowl with plastic wrap and a kitchen towel and let rise until double in bulk, 45 – 60 minutes. The rising time will depend on the type of yeast you use.


7. Prepare your filling. In a small bowl, combine the cinnamon and sugar for the filling. I found it easier to sprinkle on both the nuts and the chocolate separately.
8. Grate the pumpkin finely (remember, the finer they are, the greater the surface area, and the faster it'll be cooked through.) Put into a saucepan over low heat. Stirring occasionally. Add the sugar. Put into a blender with the milk and pureed.


9. Once the dough has doubled, make the meringue: In a clean mixing bowl – ideally a plastic or metal bowl so the egg whites adhere to the side (they slip on glass) and you don’t end up with liquid remaining in the bottom – beat the egg whites with the salt, first on low speed for 30 seconds, then increase to high and continue beating until foamy and opaque. Add the vanilla then start adding the sugar, a tablespoon at a time as you beat, until very stiff, glossy peaks form.
PHail
PERFECT PEAK

Assemble the Coffee Cakes
1. Line 2 baking/cookie sheets with parchment paper.
2. Punch down the dough and divide in half. On a lightly floured surface, working one piece of the dough at a time (keep the other half of the dough wrapped in plastic), roll out the dough into a 15 x 8-inch rectangle. Spread half of the meringue evenly over the rectangle up to about 1/2-inch (3/4 cm) from the edges.
3. Sprinkle the filling evenly over the meringue.
4. Roll up the dough jellyroll style, from the long side. Pinch the seam closed to seal. Very carefully transfer the filled log to one of the lined cookie sheets, seam side down. Bring the ends of the log around and seal the ends together, forming a ring, tucking one end into the other and pinching to seal.
5. Using kitchen scissors or a sharp knife (although scissors are easier), make cuts along the outside edge at 1-inch (2 ½ cm) intervals. Make them as shallow or as deep as desired but don’t be afraid to cut deep into the ring.
6. Repeat with the remaining dough, meringue and fillings. Cover the 2 coffee cakes with plastic wrap and allow them to rise again for 45 to 60 minutes.
7. Preheat the oven to 180°C. Brush the tops of the coffee cakes with egg wash. Bake in the preheated oven for 25 to 30 minutes until risen and golden brown. The dough should sound hollow when tapped.
8. Remove from the oven and slide the parchment paper off the cookie sheets onto the table. Very gently loosen the coffee cakes from the paper with a large spatula and carefully slide the cakes off onto cooling racks. Allow to cool.
Just before serving, dust the tops of the coffee cakes with confectioner’s sugar as well as cocoa powder if using chocolate in the filling. These are best eaten fresh, the same day or the next day.

The bottom is so ugly! But, the pumpkin filled one so soft and tasty!


5:52 PM

Joconde Imprime / entremets~~ (Dairy Free French Dessert)

The January 2011 Daring Bakers’ challenge was hosted by Astheroshe of the blog accro. She chose to challenge everyone to make a Biscuit Joconde Imprime to wrap around an Entremets dessert.


Okay, first, a vocab lesson:
A joconde imprime (French Baking term) is a decorative design baked into a light sponge cake providing an elegant finish to desserts/torts/entremets/ formed in ring molds. A joconde batter is used because it bakes into a moist, flexible cake. The cake batter may be tinted or marbleized for a further decorative effect.

Entremets (French baking term)- an ornate dessert with many different layers of cake and pastry creams in a mold, usually served cold. Think Trifle in a mold vs. a glass bowl.
A joconde imprime is the outside cake wrapper of the Entremets dessert.


This is a pretty challenging cake to make, and more so, because I want to make it dairy-free. All in all, mine turned out okay. I didn't (still don't) have a small cake ring, so had to use a 9" one. *gasps* That's massive, therefore, I didn't have enough fillings to fill it right to the top. =(
I wanted to make another one after that first attempt, but it's just been too hectic. I will definitely try a green tea flavour one some time soon.

So here it is.

Dairy Free Hazelnut and Chocolate Joconde Entrement

Patterned Joconde-Décor Paste


Ingredients
200g vegetable shortening
200g Confectioners' (icing) sugar
7 large egg whites (about 200g)
170g cake flour
60 g cocoa powder.

1. Cream butter and sugar until light and fluffy (use stand mixer with blade, hand held mixer, or by hand)
2. Gradually add egg whites. Beat continuously.
3. Sift the flour and cocoa powder together. Fold into the mixture.
4. Tint batter with coloring to desired color, if not making cocoa variation.

(Note: The quantity given here makes a LOT of batter. I do mean a lot. I made half of that and I ended up using only 1/3 of the mixture.)


To make the pattern:
1) Prepare the tray first: place a silicone baking mat on an upside down baking sheet. This makes it easier to spread. If you don't have a silicone mat, like myself, I used parchment paper. I wouldn't recommend waxed paper since it runs the risk of melting under such high temperature.
2) Pipe the paste onto the sheet. Or you could spread a thin layer on, then pattern it.
3) Freeze this for at least 20 minutes to give it time to freeze hard. In the meantime, move onto your sponge batter.

Joconde Sponge


Ingredients
85g hazelnut flour (original recipe called for almond flour)
75g confectioners' (icing) sugar
25g cake flour
3 large eggs (about 150g)
3 large egg whites (about 90g)
10g white granulated sugar or superfine (caster) sugar

1) Preheat the oven to 250ºC.
2) In a clean mixing bowl whip the egg whites and white granulated sugar to firm, glossy peeks. Reserve in a separate clean bowl to use later.
3) Sift hazelnut flour, confectioner’s sugar, cake flour. (This can be done into your dirty egg white bowl)
3. On medium speed, add the eggs a little at a time. Mix well after each addition. Mix until smooth and light. (If using a stand mixer use blade attachment. If hand held a whisk attachment is fine, or by hand. )
5) Fold in one third reserved whipped egg whites to almond mixture to lighten the batter. Fold in remaining whipped egg whites. Do not over mix.
6) If using almond meal, fold in 30g melted unsalted butter. (I omitted this, not just because it's not dairy-free, but mainly that hazelnut contain more oil than almond)

(Note: I would make the paste then the sponge, because the sponge batter doesn't seem to sit well for long)

7) Take the frozen pattern out of the freezer, spread the sponge batter over it.
8) Bake for 15 minutes until the joconde bounces back when slightly pressed. I only baked it for 4 minutes! Yes, FOUR! So PLEASE, keep an eye on the oven the whole time it's inside.

The mold I used is just a spring form pan ring with the bottom removed. Place a large piece of clingfilm over a sheet of parchment paper, then place the ring on top. Line the ring with clingfilm. (Original recipe says to pull the clingfilm tightly up the outside of the mold, line the inside with parchment paper.)

That's the outside (and bottom) of the cake done. Now for the filling. =)
I've put two types of mousses in. Now, take note, they are made of tofu. Yes, Tofu. Weird, but hey, don't knock it till you've tried it. Because they just taste so amazing; and it's healthy! Well, kind of.


Chocolate Mousse
300g silken tofu
300g bittersweet chocolate (dairy-free)
1 tbsp vanilla extract (optional)

1) Melt the chocolate in a double boiler. Set aside.
2) Process the tofu until it's smooth and creamy.
3) Add in the chocolate and vanilla.
4) Blend until fully incorporating.
5) Pour into the molded cake. Set in refrigerator.

Hazelnut Mousse
116g hazelnut butter (I made this just by processing hazelnut until the oils inside are released)
50g superfine sugar
300g silken tofu

1) Process the tofu until it's smooth and creamy.
2) Mix the hazelnut butter and the sugar, before adding into the tofu.
3) Process until well blended.
4) Pour on top of the chocolate mousse.
5) Leave to set inside the fridge for a few hours.


Yes, I know my cutting skills sucks in this. I should have wiped the knife first.
Well, we all learn from our mistakes. =)